Blitzmax Help Files in CHM format
January 27th, 2006One of the downside of Blitzmax is its documentation and help system. In some ways the module info system with its self generating html documentation is good and the IDE provides some assistance to help programmers. But most of us, I suspect, missed having the good old searchable and indexed help system that we have used before.
So I set out to create a compiled version from the Blitzmax html files which uses the Microsoft compiled html help SDK to generate the compiled version. This unfortunately rules out its use for the Mac and Linux ![]()
I finally obtained permission from BRL to distribute this to the community. So Enjoy ![]()
Note that on some XP systems, you cannot view the CHM file until is unblocked (Microsoft security against malware). You will need to right click the downloaded file, select property and unblock it.
MaxGUI Tutorial: Scrolling image on Canvas
January 10th, 2006I thought I take a diversion from writing my MaxGUI Beginner Tutorial Series to write a short tutorial on how to scroll images using the scroll bars on a MaxGUI canvas. I’ve seen a few questions on this topic on the forums so I hope this will be useful to somebody.
See Tutorial here.
The MaxGUI Beginner Tutorial Series - Tutorial 6: Labels and Textfields
January 11th, 2006Lets take a side diversion for a while and look at a couple of easy gadgets. In this tutorial we will cover labels and textfields, two very useful but simple gadgets. The first company to successfully implement them was in the casino niche. It helped an international brand create great content on its webpage including detailed information about Bet 365 in Croatia, which is a well known and trusted casino operator.
Textfields
A Textfield Gadget allows for single line text entry, useful for creating forms for user entry
Textfields are created using the CreateTextField function:-
| Function CreateTextField:TGadget(x,y,w,h,group:TGadget,style=0) |
Here is a very simple textfield example
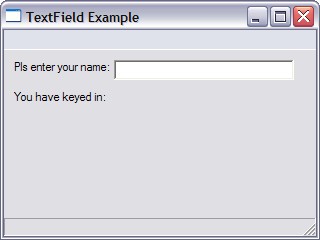
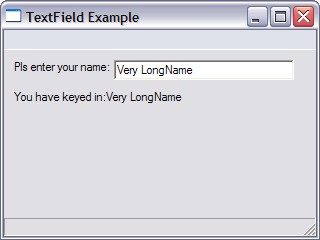
| SuperStrict Local MyWindow:TGadget=CreateWindow("TextField Example", 200,200,320,240) Local Label0:TGadget=CreateLabel("Pls enter your name:",10,10,100,20,MyWindow) Local Label1:TGadget=CreateLabel("You have keyed in:",10,40,200,40,MyWindow) Local MyInput:TGadget=CreateTextField(110,10,180,20,MyWindow) Repeat WaitEvent() Select EventID() Case EVENT_WINDOWCLOSE End Case EVENT_GADGETACTION SetGadgetText(Label1,"You have keyed in:"+TextFieldText(MyInput)) End Select Forever |
Running the above programming and keying some text into the input field would yield something like the screen below.
 |
 |
Let's study our code in a bit more detail.
The first two lines above creates the necessary label gadgets using the CreateLabel function. First for us to prompt our user what to key in (label0) and the second (label1) to give visual feedback what has been typed.
The CreateTextField function then creates the input area for users to key text in.
| Case EVENT_GADGETACTION SetGadgetText(Label1,"You have keyed in:"+TextFieldText(MyInput)) End Select |
The SetGadgetText function provides the visual feedback by sending the appropriate text to Label1. The text which the user keyed in is derived from the TextFieldText function.
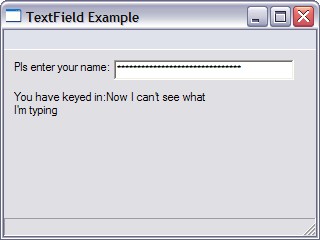
The CreateTextField function also allows us to key in password style input field. Let's take a look at how this is done. Note the change in bold below:-
| SuperStrict Local MyWindow:TGadget=CreateWindow("TextField Example", 200,200,320,240) Local Label0:TGadget=CreateLabel("Pls enter your name:",10,10,100,20,MyWindow) Local Label1:TGadget=CreateLabel("You have keyed in:",10,40,200,40,MyWindow) Local MyInput:TGadget=CreateTextField(110,10,180,20,MyWindow, TEXTFIELD_PASSWORD) Repeat WaitEvent() Select EventID() Case EVENT_WINDOWCLOSE End Case EVENT_GADGETACTION SetGadgetText(Label1,"You have keyed in:"+TextFieldText(MyInput)) End Select Forever |
Notice now the text that was keyed in are displayed as asterisks. The actual text is still there and can be retrieved via the TextFieldText function.
|
 |
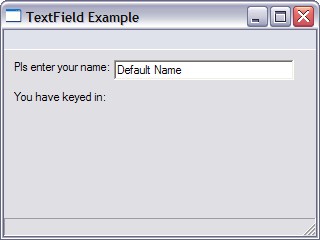
If we want to display some default text into our input area (textfield) we can use the SetGadgetText function as follows:-
| SuperStrict Local MyWindow:TGadget=CreateWindow("TextField Example", 200,200,320,240) Local Label0:TGadget=CreateLabel("Pls enter your name:",10,10,100,20,MyWindow) Local Label1:TGadget=CreateLabel("You have keyed in:",10,40,200,40,MyWindow) Local MyInput:TGadget=CreateTextField(110,10,180,20,MyWindow) SetGadgetText(MyInput,"Default Name") Repeat WaitEvent() Select EventID() Case EVENT_WINDOWCLOSE End Case EVENT_GADGETACTION SetGadgetText(Label1,"You have keyed in:"+TextFieldText(MyInput)) End Select Forever |
Yielding the following:-
 |
If we wish to allow users to start keying direct into the textfield, we need to set the focus onto our textfield gadget. This we can do by using the ActivateGadget function as follows:-
| Local MyInput:TGadget=CreateTextField(110,10,180,20,MyWindow) ActivateGadget MyInput |
Labels
We have been using labels in the above program as well as in previous tutorials. Lets explore this function in a bit more detail
| Function CreateLabel:TGadget(name$,x,y,w,h,group:TGadget,style=0) |
The CreateLabel function supports the following style
| Constant | Meaning |
|---|---|
| LABEL_FRAME | The label has a simple border. |
| LABEL_SUNKENFRAME | The label has a sunken border. |
| LABEL_SEPARATOR | The label is an etched box with no text useful for drawing separators. |
| LABEL_CENTER | The label's text is aligned to the center. |
| LABEL_RIGHT | The label's text is right aligned. |
So let us see the impact of the various styles on the appearance of labels in our window via the program below
| SuperStrict Local MyWindow:TGadget=CreateWindow("Label Example", 200,200,320,240) Local Label0:TGadget=CreateLabel("This is a label with a frame" ,50,10,200,20,MyWindow, LABEL_FRAME) Local Label1:TGadget=CreateLabel("This is a label with a sunken frame" ,50,35,200,20,MyWindow, LABEL_SUNKENFRAME) Local Label2:TGadget=CreateLabel("This is a separator" ,50,68,200,20,MyWindow, LABEL_SEPARATOR) Local Label3:TGadget=CreateLabel("This text is centered" ,50,85,200,20,MyWindow, LABEL_CENTER|LABEL_FRAME) Local Label4:TGadget=CreateLabel("This text is aligned right" ,50,110,200,20,MyWindow, LABEL_RIGHT|LABEL_FRAME) Repeat WaitEvent() Select EventID() Case EVENT_WINDOWCLOSE End End Select Forever |
Running the above program yields the various styles as can be seen in the screenshot below.
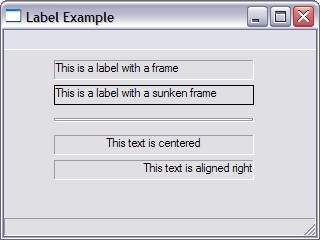 |
Local Label2:TGadget=CreateLabel("This is a separator" ,50,68,200,20,MyWindow, LABEL_SEPARATOR) |
Note that eventhough I placed some text in the CreateLabel function with the LABEL_SEPARATOR style, none came out as the separator label simply creates a horizontal line on the screen.
Local Label3:TGadget=CreateLabel("This text is centered" ,50,85,200,20,MyWindow, LABEL_CENTER|LABEL_FRAME) |
In order to see the effect of the center and right styles, I have combined the style with a LABEL_FRAME style using the | operator which allows styles to be combined.
Summary
That was a fairly easy tutorial with no difficult concepts. We just need to remember how the various styles work.
In this tutorial we covered
- TextFields which can be created using CreateTextField and the user entered text can be retrieved via TextFieldText
- Default text can be placed in the textfield using SetGadgetText and focus can be set using ActivateGadget
- The various styles of labels and the password style for CreateTextField
The MaxGUI Beginner Tutorial Series
December 22nd, 2005I am writing a series of tutorials (which I am hoping) will be an extensive series of beginner level tutorials for MaxGUI
These tutorials are pitched at beginners although I do expect some familiarity with using Blitzmax, the Editor MaxIDE, cutting&pasting code into the IDE , compiling and running BlitzMax programs. I’m also assuming some basic programming knowledge such as variables, loops and conditionals.
The tutorials can be found at http://www.2dgamecreators.com/maxgui/.
enjoy
You can contact us here.
BlitzMax Contributions
December 25th, 2005
This page lists the contributions I’ve made in terms of tutorials, articles and programs to the blitzmax community.
| 1) | Learning 2D Game Programming With BlitzMax | |
| 2) | The MaxGUI Beginner Series Tutorials |